
Arlo Doorbell Installation Instructions
Want to learn how to set up Arlo Doorbell using wired as well as wireless method? You will find an overview of the Arlo Doorbell camera installation process. We have discussed two methods – wired and wireless.
Arlo Wired Doorbell Installation
With Doorbell or Chime
Before You Begin
It is recommended that you keep the following things ready before you get down to the Arlo wired Doorbell installation process:
- See to it that at the breaker, the power is off.
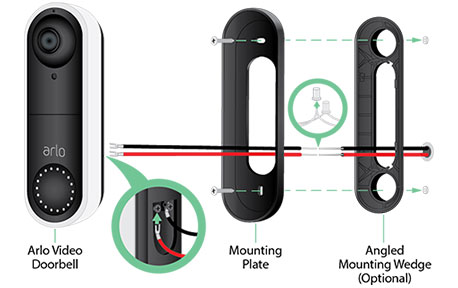
- The next step is to install the ARLO POWER KIT.
- See to it that you have access to a screwdriver, doorbell transformer, and a drill.
Installation
Ensure that you read these instructions in the same way as they are to avoid issues.
- Start the process by removing the Doorbell from the wall.
- Disconnect the wired that are connected to the Doorbell.
- Tape the wires in order to stop them from falling.
- Use the mounting wedge to angle your Arlo Video Doorbell.
- Switch on the power next.
- Make sure that the LED LOCATED on the front of the Doorbell is WHITE in color.
- Load the Arlo app.
- Select DOORBELLS & CHIMES.
- Once done, click the VIDEO DOORBELL WIRED option.
Without Doorbell or Chime
Before You Begin
- For the initiation of the setup process, launch the Arlo Secure App.
- Tap ADD NEW DEVICE > DOORBELLS & CHIMES > VIDEO DOORBELL.
- Go through the INTRODUCTION SCREENS and select the NEXT button.
- It is recommended that you skip the non-applicable steps.
- Move ahead of the WHICH ONE LOOKS LIKE YOUR CHIME BOX screen.
- And for HOW MANY WIRES DO YOU SEE, select TWO.
- Swipe left through the next few screens.
- Wait for the REPLACE CHIME COVER option to appear.
- Select CONTINUE to skip these steps.
- It is recommended that you keep the app open and go through the steps.
- See to it that your device is accessing the WiFi throughout the process.
Installation
- Position the AC adapter wires to the best location.
- By the way, do this with the plug-in AC power adapter unplugged.
- Do Arlo Doorbell camera installation with or without mounting wedge.
- Switch on the power after plugging the power adapter into the socket.
- Soon the LED RING located at the front will become WHITE.
- In case the LED light is off, it means that the device is booting.
- Do not interrupt the process unnecessarily.
- Go through the steps given on the Arlo app to connect the Doorbell to the network.
- Select the NONE button.
- This will help you to prevent any damage to your power adapter.
Arlo Video Doorbell Wireless Installation
What You Need
- Ensure that you have access to all the items that came in the box.
- The ARLO APP should be installed on the mobile.
- You ought to have a screwdriver and a power drill.
Installation
Before you start reading the arlo doorbell installation instructions, you should know that the wire-free process takes place in two phases.
In the first phase, you need to connect the doorbell to the Arlo account, and in the second phase, you ought to mount the doorbell to the wall.
Below, we have briefly talked about the arlo video doorbell installation process:
- First of all, charge the battery that camera with the Doorbell.
- Connect the mobile device to the 2.4 GHz WiFi network.
- JOIN the DOORBELL to the NETWORK.
- This needs to be done with the QR CODE.
- Find an ideal location and position the Doorbell for the installation process.
- At last, mount the Arlo Doorbell.
Now that you have learned how to set up Arlo Doorbell using the wired as well as wireless method, you can operate it with ease. To learn in detail about the several features of Doorbell, you ought to read what is given in the user manual.