
How to Perform Arlo Firmware Update Manually?
Just like other technical devices need time-to-time updates, your Arlo security camera also needs to get updated on a regular basis. Although Arlo firmware update is done automatically, you always have the option of getting the latest firmware installed manually. This blog will walk you through the process that you can employ to update your Arlo security camera using the manual process. Keep on reading ahead to get acquainted with the firmware update process.
Arlo Firmware Update: Before You Begin
Arlo camera gets automatically updated usually between 3:00 am and 5:00 am. But manual updates can be done at any time as per your convenience. There are a few points that you need to take into account prior to commencing the Arlo firmware update process.
- It is necessary that the Alro security camera battery should be sufficiently charged. Thus before you update your camera consider charging its battery.
- Another essential thing that you need to keep in mind is that the Arlo camera firmware update process should not be interrupted in between. So do not remove the battery, open the battery door or do anything else that may hinder the process.
- A stable internet connection is important. Thus, ensure that the internet connection is not at all shaky.
How to Update Arlo Camera Firmware?
Let us now tell you how to update your camera manually. Here are the step-by-step instructions using which you can easily execute the Arlo firmware update:
Step 1: Download the App
If you haven’t downloaded the Arlo app on your smartphone yet then get it downloaded and installed it first. So, unlock your smartphone and go to App Store or Play Store. Look for the Arlo app ib the app store and when the search results appear, install the app on your phone. Ensure to install the latest version of the Arlo app.
Step 2: Launch the App
It is now time to open the app on your phone. Thus, as soon as the Arlo camera app gets installed, tap on its icon to launch it.
Step 3: Log In
Using the correct admin login credentials, log in to your Arlo account now. Be assured that you put to use the correct email id and password that you used while creating the account.
You can also use a web browser to get the job executed. You need to type my.arlo.com in the URL bar of an updated web browser. After you hit Enter, you will reach the login page of the Arlo account. Using the admin login credentials, do the login.
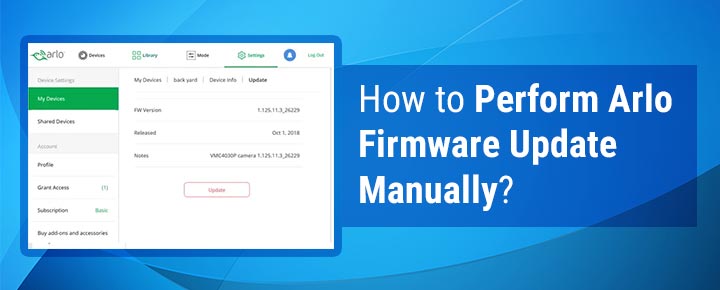
Step 4: Update Firmware
After you reach the admin dashboard, click or tap on Settings and then select My Devices. Thereafter choose the device that you want to update by clicking/tapping on it. Now, select Device Info > Firmware > Update in the same sequence.
Your Arlo camera will begin updating and soon it will be running on the most recent firmware version. To complete the Arlo firmware update it is required that you update your Base Station also if you have it installed along with the camera.
How to Update Arlo SmartHub or Base Station?
Apart from updating your Arlo camera, you also need to update the Arlo Base Station or SmartHub. The instructions for updating your Base Station are also given in the next section.
- Ensure that the Arlo Base Station is powered up properly and is receiving a non-fluctuating power supply. Thus, connect it to an active and non-damaged power socket.
- Launch the Arlo app on your phone or load an internet browser and type my.arlo.com.
- Log in to the Arlo account now.
- Go to Settings after you reach the admin dashboard.
- Thereafter, go to My Devices.
- Select your SmartHub.
- Click or tap on Device Info and then on Firmware and finally click on Update.
- Arlo Base Station will begin updating.
- Do not interrupt the process by turning off the Base Station or doing any other activity on your phone or PC.
This is how you can update your Arlo security camera and Arlo Base Station in an easy manner. If you get stuck while performing the Arlo firmware update, you can at any time contact our team to help you out.